aperture

Understanding Aperture

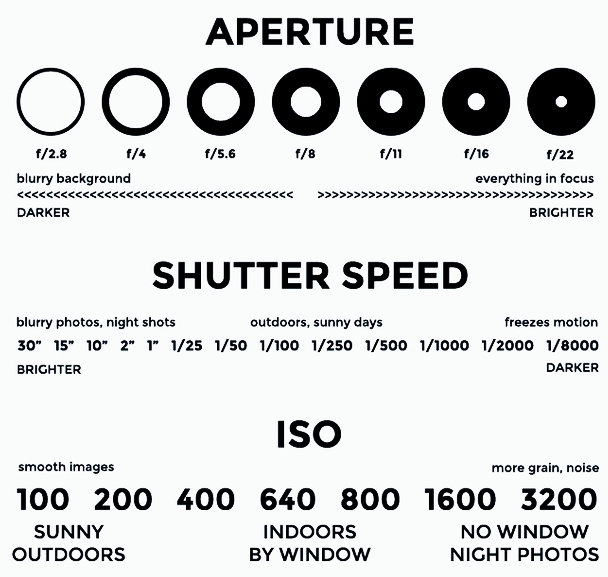
When you press your camera’s shutter release button, a hole opens up to let the image sensor view the scene. This opening is the aperture, which you can adjust to let more or less light hit your camera’s sensor.

Aperture is measured in “f-stops”: f/2.8, f/4, f/5.6, f/8, f/11, f/16, f/22.
Note: the large apertures (larger openings) are given smaller numbers.

The size of the lens opening is doubled, or halved, when you move from one f-stop to the next. The smaller the f-stop number, the larger the opening.

When you change your camera’s aperture, the main thing that will change is the depth of field (DOF), which controls how much of your shot is in focus. With a large depth of field, most of your image will be in focus (a large DOF is typically used for landscape shots). When you use a small depth of field, part of the image will in focus and the rest will be blurry. A shallow depth of field is often used for portraits (it keeps the focus on the subject, rather than the background), macro photography, and creative shots. Smaller f-stop numbers (large apertures) decrease the depth of field, while large f-stop numbers (small apertures) increase the amount of the scene that’s in focus.

If you’re working in your camera’s manual mode, keep in mind that when you change the aperture, you’ll also have to adjust the ISO and shutter speed to maintain exposure. (More on that here.) 

You can also work in Aperture Priority Mode — usually indicated by “A” or “Av” on your camera. In this semi-manual mode, you select the f-stop number and the camera will automatically select the proper shutter speed.

Understanding Exposure

If you want to venture out of your camera’s auto mode to have more control over your images, one of the most important things to understand is exposure, which determines how light or dark your photo will be.

If your camera doesn’t let in enough light, your photo will underexposed and you won’t see things very well. If you let in too much light, your photo will be overexposed – it’ll be too bright to see details. Your goal is to achieve perfect exposure by balancing three main elements: ISO, aperture, and shutter speed.

  • ISO is the measure of the camera sensor’s light sensitivity.
  • Aperture is the opening in a lens that can be adjusted to let more or less light hit a digital camera’s sensor.
  • Shutter speed is the amount of time, expressed in fractions of a second, that the shutter is open to let light through the aperture.

ISO, aperture, and shutter speed all work together. These settings can help you achieve certain creative effects, but you have to keep in mind that if you adjust one setting, the other two will be affected. You’ll have to adjust all three in order to maintain perfect exposure. Refer to the chart below to see how they affect your photos.

 
Exposure cheat sheet. Aperture, shutter speed, and ISO settings for digital photography.
 

Your DSLR should have a light meter to gage your exposure. If your meter is at 0, your photo is perfectly exposed; -2 is underexposed, and +2 is overexposed.

If your pictures are too bright, try upping your shutter speed, increasing your aperture, and/or reducing your ISO. If your pictures are too dark, reduce the shutter speed, decrease your aperture, and/or increase the ISO.